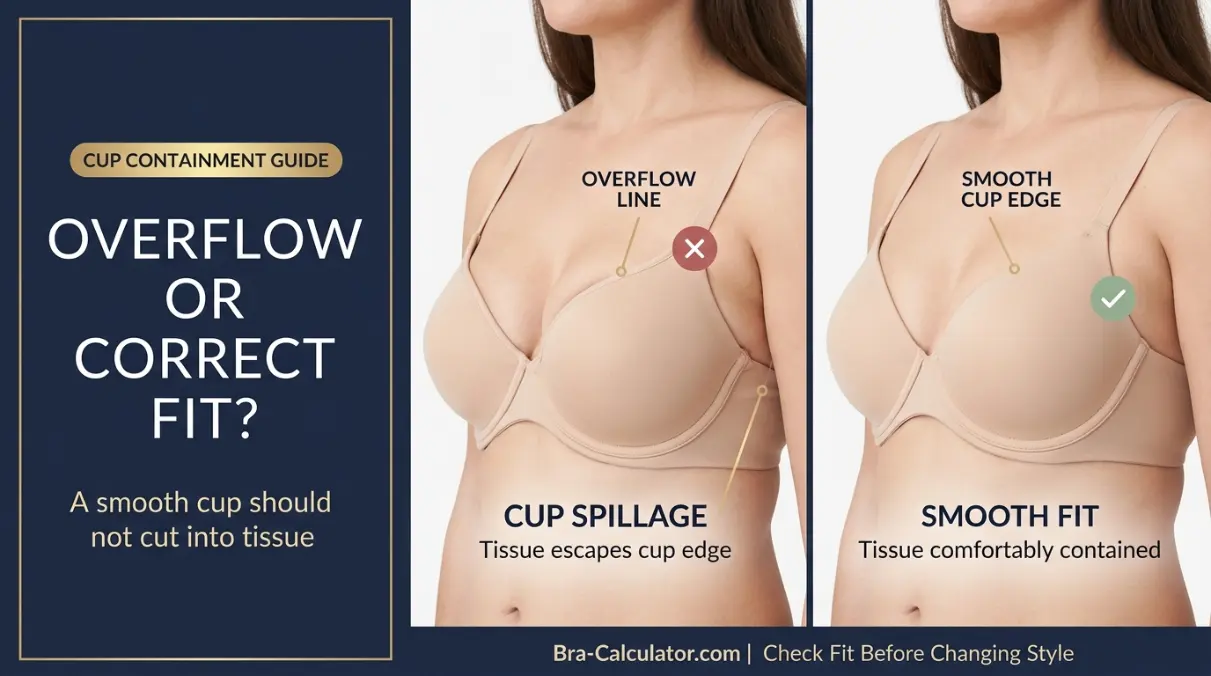
Bra cup spillage means breast tissue is escaping outside the cup instead of being comfortably contained inside it. If tissue bulges over both cup edges after you scoop and swoop, your cup is often too small. However, overflow may also happen when a cup is too shallow, too narrow, too closed along the neckline, or when the band shifts and cannot anchor the bra. Check where the overflow happens, confirm the band stays level, and choose more cup volume or a better cup shape based on the full fit pattern.
Bra Cup Spillage at a Glance
| Fit Sign | What It Usually Suggests |
|---|---|
| Top overflow or “quad boob” ridge | The cup may be too small or the upper edge too closed for your tissue. |
| Side breast tissue outside the cup or wire | The cup may be too small, too narrow, or not properly filled after scoop-and-swoop. |
| Tissue escaping underneath the cup | The band may be too loose, the cup may be too small, or the wire may not remain at the breast root. |
| Spillage plus gaping in another area | Do not assume the cup is too big; a shallow or mismatched cup may be failing to distribute tissue. |
| Only one breast spills | Natural asymmetry is likely; fit the fuller side rather than compressing it. |
| Overflow develops later in the day | Movement, tissue settling, hormonal changes or a slipping band may reveal an unstable fit. |
What Does Breast Spilling Out of a Bra Actually Mean?
A bra cup is designed to surround and support breast tissue without cutting across it. When tissue pushes over the neckline, escapes near the underarm, slips beneath the underwire or forms a visible ridge under a shirt, the bra is not providing smooth containment. This is called bra cup spillage, cup overflow or, when the upper edge creates a divided bulge, the familiar quad boob bra effect.
Unlike top-only gaping, spillage is commonly a sign that the cup does not have enough usable room for your tissue. But usable room is not only about the letter on the label. A cup can be large enough in total volume yet still spill if it is too shallow from front to back, too narrow at the wire, or too closed at the neckline for fuller upper tissue. This is why simply moving up one cup size helps many people but does not solve every overflow problem.
Fit also depends on the band. The band supplies the stable anchor that keeps cups aligned with the breast root. When it is stretched out or too loose, the bra can ride up, tilt forward or allow tissue to escape below and around the cups. For an accurate diagnosis, always check cup symptoms together with band position and strap comfort.
Comfort-first reminder: Cups should contain breast tissue without pinching, visible bulges or wires sitting on tissue. Spillage is a fit signal, not something you need to accept or hide by tightening the straps.
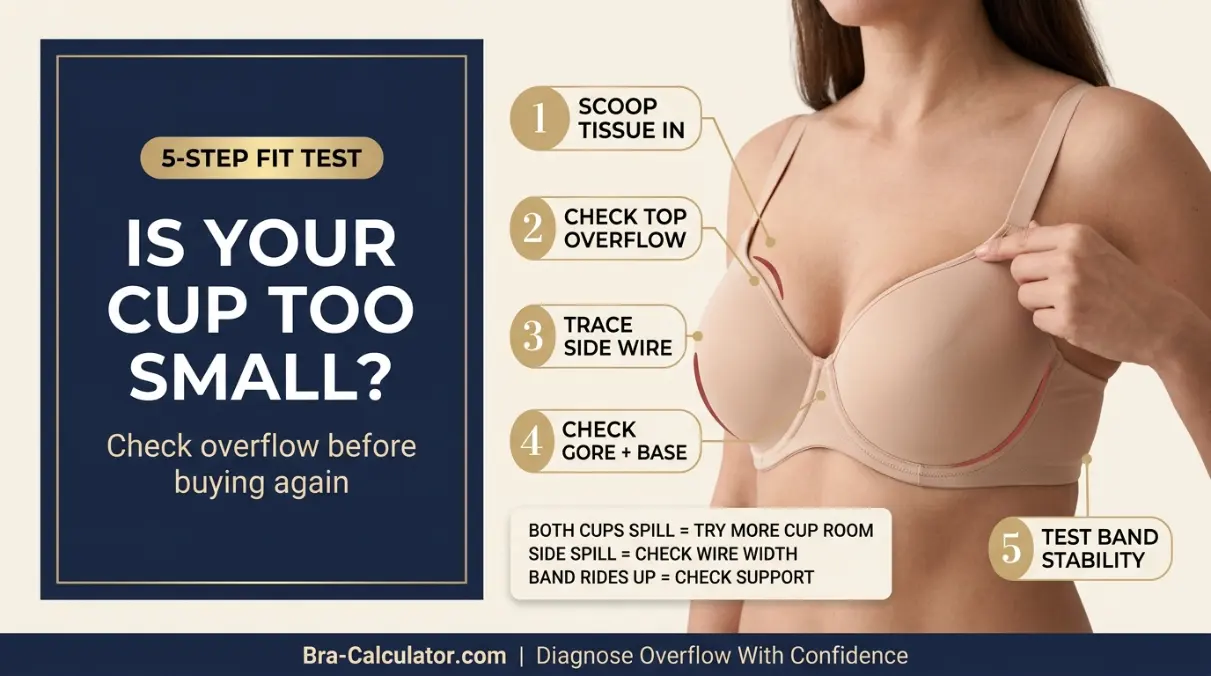
How to Tell Whether Your Bra Cup Is Too Small
Before choosing a new size, use these checks to identify whether you need more cup volume, a different cup shape or a more stable band. Try the tests in a non-padded bra if possible, because thick molded foam can hide the way tissue is sitting.
Lean slightly forward and guide all side and underarm breast tissue inside the wire and cup. If new overflow appears after tissue is correctly positioned, the cup was not containing your actual breast volume.
Stand naturally and look for a raised ridge where the upper cup presses into tissue. A noticeable double-bulge or quad-boob line points to inadequate room or an overly closed upper cup.
The wire should sit around breast tissue rather than on it. If tissue remains outside the wire near your underarm, you may require more cup space, a wider wire or stronger side-support construction.
If the center gore floats or tissue pushes down beneath the cup, the bra may not have enough depth or volume. A loose band can worsen bottom escape, so check the foundation as well.
Raise your arms and look at the back band. If it rises, shifts or feels very loose, the solution may include a firmer band and a carefully adjusted cup size, not simply a larger cup on the same unstable band.
| Test Result | Likely Meaning | Best Next Step |
|---|---|---|
| Both cups bulge at the neckline; band is stable | Cup volume may be too small | Try the same band with a larger cup. |
| Spillage appears only at the upper edge but cup wrinkles lower down | Cup shape may be too closed or shallow | Try a more open/stretch upper cup or deeper shape. |
| Tissue sits outside the side wire | Cup may be too narrow or small | Compare wider-wire or side-support bras. |
| Tissue slips beneath the cup and band rises | Band and cup support may both be inadequate | Remeasure and consider firmer band logic. |
| Only one cup spills | Likely natural asymmetry | Fit the fuller breast and fine-tune the smaller side. |
Where Your Cup Spills Tells You What to Fix
“My bra overflows” can describe several different fit issues. Pay attention to exactly where breast tissue escapes; the location often reveals whether the main problem is cup volume, cup shape, wire width or band stability.
| Where Spillage Appears | Common Cause | Useful Direction |
|---|---|---|
| Across the top neckline | Too-small cup or cup edge that is too closed on top | Try more cup room; if lower cup is loose, try a more open/stretch neckline instead. |
| At the center cleavage edge | Cup not containing central fullness, or plunge shape too low for tissue | Consider more center coverage or a style suited to close-set/full-center tissue. |
| At the underarm side | Too-narrow wire, insufficient cup capacity or tissue not scooped inside | Retest after scoop-and-swoop and look for side support or wider wires. |
| Beneath the underwire | Band too loose, cup too small or breast tissue pushing the cup down | Check band security, wire position and cup depth. |
| Only on one side | Normal asymmetry | Contain the fuller breast first; do not downsize both cups to fit the smaller side. |
Important difference: When a bra has both gaping and spillage, it is often a shape problem. A shallow cup may leave empty space near the edge while forcing breast tissue over another edge. Review the bra cup gaping guide if you see both symptoms together.
Why You Get Overflow Bra Fit Problems
1. Cup Volume Is Too Small
When both breasts visibly bulge above or beyond the cup after proper fitting, the clearest explanation is usually that the cup is not large enough to hold your tissue comfortably.
2. The Cup Is Too Shallow
Shallow cups spread breast tissue outward instead of giving it enough forward depth. You may see top or side overflow even when the bra also looks loose or creased in another area.
3. The Top Edge Is Too Closed
For fuller-on-top or firm breast tissue, a cup with a tight upper edge may cut across tissue and create quad-boob even if the lower cup feels reasonably filled.
4. Cups or Wires Are Too Narrow
Side overflow can mean the wire does not surround the full breast root. If the wire rests on tissue toward the underarm, the bra is compressing rather than containing.
5. The Band Is Not Holding the Bra in Place
A band that rides up or stretches excessively allows the cup to shift and tissue to escape, especially from below. The wearer may then tighten straps and create additional shoulder pressure.
6. You Are Fitting to the Smaller Breast
When one breast is fuller, choosing a cup that fits only the smaller side can cause ongoing overflow on the larger side. This is not a fitting failure; asymmetry is normal.
Step-by-Step: Fix Bra Cup Overflow
The right solution should contain breast tissue smoothly without simply tightening the straps or hiding overflow beneath clothing. Make one fit adjustment at a time, then check the result in motion.
Scoop tissue from the side and underneath into the cups. The wire should surround the breast root. This often reveals that a cup which looked acceptable is actually too small once tissue is positioned correctly.
Wear a new bra on its loosest comfortable hook. The band should stay level as you move. If it rides upward, read the bra band too loose guide before assuming a cup-only change will solve everything.
If the band is secure but breast tissue spills from both cups, try a larger cup while maintaining the band. Check that the new cup contains tissue smoothly without creating gaps or wire discomfort.
If a larger cup creates gaping while your current cup spills, your breasts may need more depth, wider wires, side support or a less restrictive upper edge rather than simply more overall volume.
Lift your arms, sit and move naturally. A supportive cup should keep tissue contained without top ridges, side escape, underwire migration or the urge to keep readjusting throughout the day.
Why the Same Cup Can Spill on Different Breast Shapes
Cup labels describe a volume relationship, but they do not describe how that volume is distributed. Breast root width, projection, upper fullness, firmness and asymmetry all affect whether a bra contains tissue smoothly or allows overflow.
Upper Edge Can Cut In
A closed neckline may create a top ridge even when the lower cup seems filled.
Try open/stretch topShallow Cups Push Out
More depth may contain breast tissue better than simply choosing a wider molded cup.
Try deeper cupsSide Tissue Escapes
Narrow wires may sit on tissue and create visible underarm overflow.
Try wider wiresOne Cup Spills
Choose enough room for the fuller breast and customize the smaller side as needed.
Fit fuller sideHelpful note: Sudden breast-size changes, a new lump, skin changes or persistent pain should not be treated only as a bra-fit issue. Seek appropriate medical guidance for new or concerning symptoms.
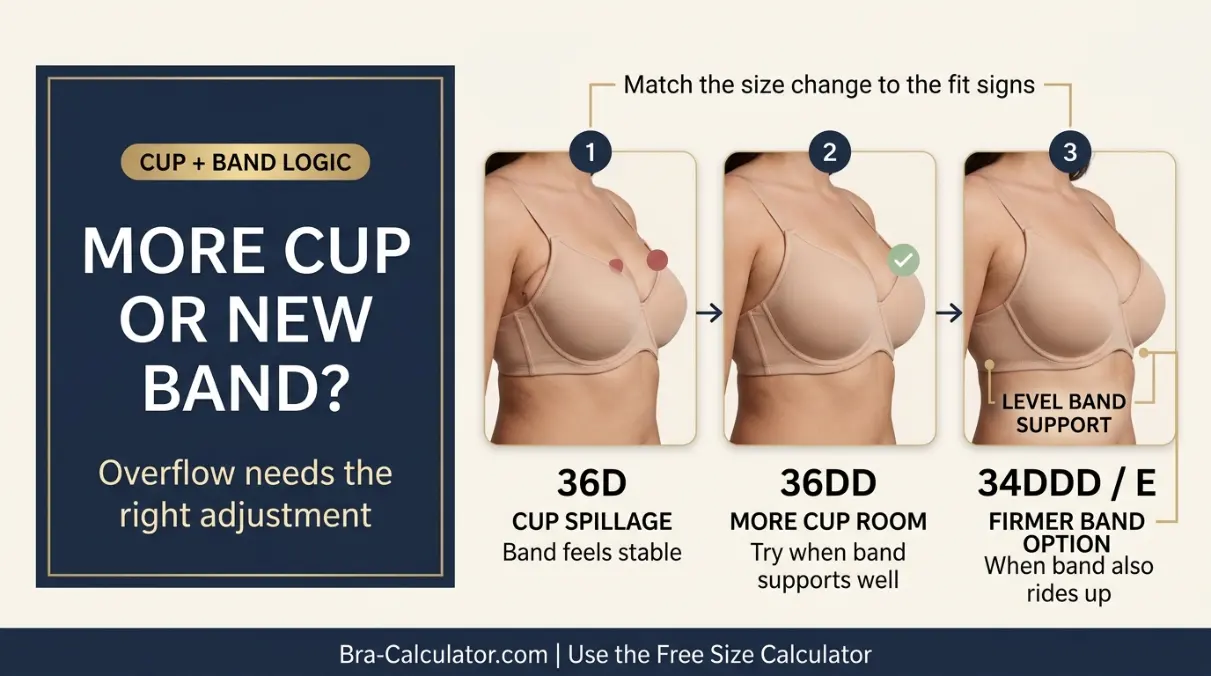
How to Adjust Size When Cups Spill Over
For clear cup overflow, the usual direction is more cup capacity. The exact move depends on whether your band is already secure or also needs correction. Keep in mind that letter progression differs by US and UK brands, especially after DD.
| Your Fit Signs | Adjustment Direction | Why |
|---|---|---|
| Top or side spillage; band is stable | Keep band, increase cup volume | The cup needs more room while the foundation already works. |
| Spillage plus band rides up | Try a firmer band with enough added cup capacity | A smaller band alone may preserve too little usable room for overflowing tissue. |
| Spillage plus gaping or lower wrinkles | Try a deeper or differently shaped cup | Volume alone may not correct a shallow or closed-cup mismatch. |
| Spillage on one breast only | Fit the fuller breast first | A smaller overall cup will compress the fuller side. |
What Should You Fix First?
- Both cups overflow after scoop-and-swoop
- Top ridge shows under clothing
- Band stays secure and level
- Test a larger cup on the same band
- Check wire no longer sits on tissue
- Retest the neckline when moving
- Overflow occurs with gaping elsewhere
- Side tissue escapes despite cup room
- Top edge cuts in while cup bottom wrinkles
- Try deeper or wider-wire cups
- Use stretch or open upper cup designs
- Compare seamed support styles
- Band rides up at the back
- Tissue escapes underneath
- Cups shift when arms lift
- Check a firmer band direction
- Preserve or increase needed cup room
- Do not tighten straps to compensate
- Only one breast spills
- Other cup fits comfortably
- One side is naturally fuller
- Fit the fuller breast
- Adjust smaller-side strap gently
- Consider flexible cups or an insert
Bra Styles That Can Improve Cup Containment
Can contain upper and side tissue more securely when cup size and depth are correct.
Useful when breast tissue moves outward or escapes near the underarm area.
Accommodates fuller upper tissue without creating a sharp quad-boob edge.
Often gives deeper containment when shallow molded cups push tissue out.
Can improve stability when cup containment worsens because the bra shifts during wear.
May intensify overflow when tissue already needs more depth or cup space.
Shop Styles for Better Cup Containment
If your fit checks confirm that you need fuller containment, these supportive bra categories may be worth comparing. Always select the corrected cup size and check the brand’s specific sizing and return policy before purchasing.

Wide Padded-Strap Full-Coverage Bras
- Full coverage can help contain upper breast tissue once the cup volume is corrected.
- Wider straps may improve comfort without relying on excessive strap tension.
- Choose adequate cup depth so coverage does not simply press tissue outward.

U-Back Support Bras With Wide Straps
- A stable back design can keep correctly sized cups better positioned during movement.
- Helpful when cup overflow worsens as the band or straps shift through the day.
- Make sure the selected cup still offers enough capacity for your fuller side.

Wireless Comfort Bras With Cushioned Straps
- A softer option when rigid wires or edges feel uncomfortable during relaxed wear.
- Look for structured cups and a firm enough band to avoid tissue escaping underneath.
- Comfort fabric should complement correct sizing, not hide continued overflow.
Problems Often Seen Alongside Cup Spillage
Empty space in one area with bulging in another often means the cup shape is not matching your tissue distribution.
A shifting band can destabilize cup containment and allow breast tissue to escape beneath or beyond the cup.
When cups overflow, wearers sometimes tighten straps in an attempt to pull tissue upward and restore support.
Side or lower overflow may happen when the wire does not enclose the breast root correctly.
Frequently Asked Questions
What does bra cup spillage mean?
Bra cup spillage happens when breast tissue is not fully contained by the cup and pushes beyond the neckline, side or bottom edge. It commonly points to a cup that is too small, but cup depth, wire width, upper-cup shape and band security can also matter.
Does breast spilling out of a bra mean the cup is too small?
Often, yes—especially when both cups bulge after proper scoop-and-swoop and the band is stable. But if the cup spills in one area while gaping or wrinkling elsewhere, try a different cup shape or depth before assuming a simple size increase is enough.
What are common bra cup too small signs?
Common signs include top-edge bulging, a visible quad-boob line, side tissue sitting outside the wire, a floating center gore, underwire pressing on breast tissue or tissue escaping underneath the cup.
How do I fix a quad boob bra line under clothes?
Start by ensuring all tissue is inside the cups and that the band is stable. If the neckline still cuts in, try more cup volume or a cup with a more flexible or open upper edge, such as stretch lace.
Why do I have side overflow near my armpits?
Side overflow may be tissue that needs scooping into the cup, or it may indicate cups or wires that are too small or narrow for your breast root. A wider-wire, side-support design with enough capacity may improve containment.
Can my band cause breast tissue to spill out?
Yes. A band that rides up or shifts cannot hold cups securely at the breast root. When the band is loose and cups spill, consider both a firmer anchor and sufficient cup room rather than only increasing cup size.
What if only one of my cups overflows?
Natural breast asymmetry is common. Choose a cup that comfortably contains the fuller breast; then fine-tune the smaller side with its strap, a removable insert or a flexible cup fabric.
Which bra styles are best when cups overflow?
After checking size, try fuller-coverage bras, side-support cups, seamed projected designs or stretch-lace upper cups. The most suitable option depends on whether you spill at the top, center, side or bottom.
Find a Bra Size That Holds You Comfortably
Overflow should not be solved by hiding the bulge or tightening straps harder. Start with your correct measurements, then choose enough cup room and a shape that contains your breast tissue smoothly.