How to Measure Panty Size
Amelia B. · Bra Fit Specialist · Find the correct tape position, avoid the small errors that shift a chart result, and turn two reliable body measurements into a more dependable panty-size starting point.
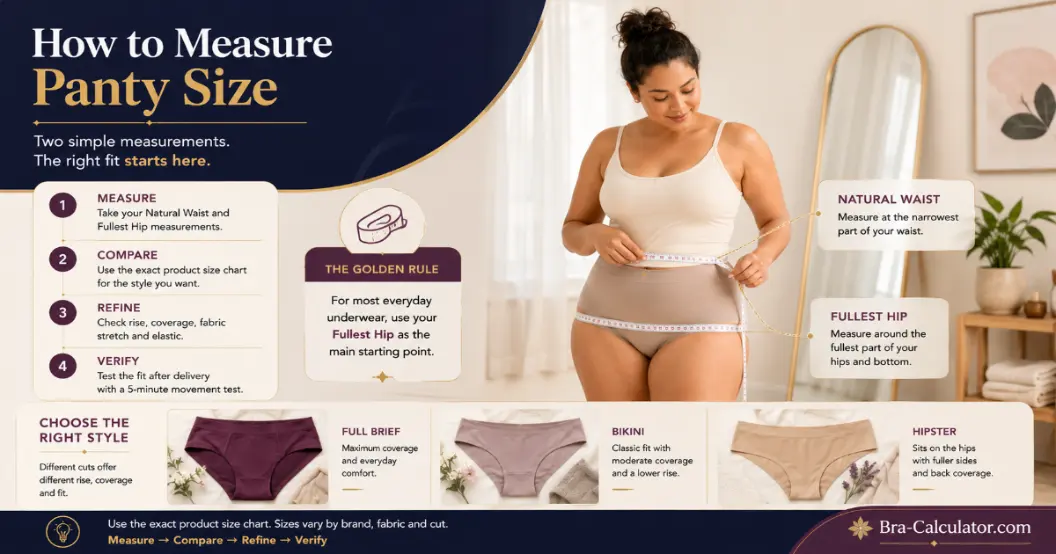
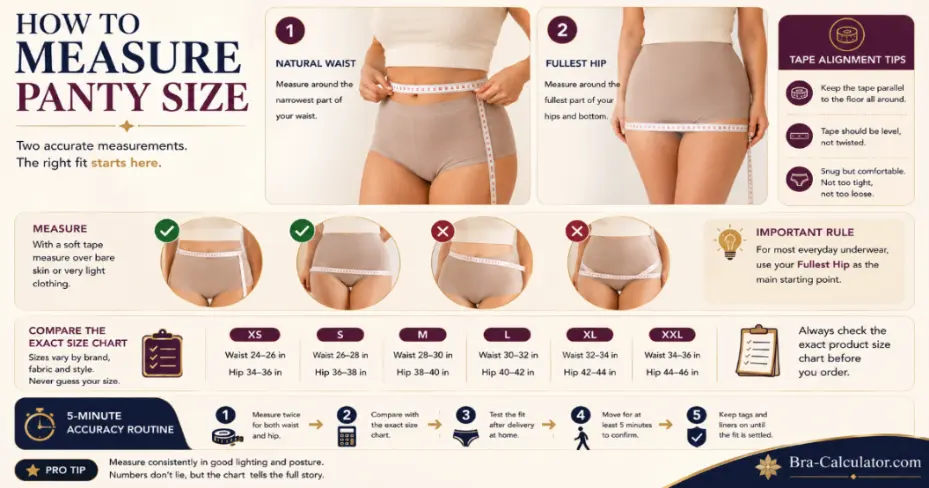
Measure the natural waist around the torso’s natural crease and the fullest hip around the widest level path across the hips and seat. Keep the tape parallel to the floor, close without compression and completely untwisted. Repeat both readings; when one number does not repeat, correct the tape rather than averaging the mistake. Use those current body measurements—not jeans sizing—to choose a starting panty size.
In This Guide
- What you need before measuring
- Step 1: find and measure the natural waist
- Step 2: measure the fullest hip and seat
- Step 3: check the tape from the side
- Common measurement mistakes
- What to measure for different rises
- Accessible and assisted measuring
- Use the measurements
- When waist and hip suggest different sizes
- A five-minute accuracy routine before you calculate
- At-home fit test
- Common mistakes
- Product-page checklist
- Amazon product comparisons
- Frequently asked questions
What you need before measuring
Flexible tape
Use a soft, non-stretch body or sewing tape. A rigid builder’s tape does not follow the body accurately.
Close-fitting clothing
Measure over thin leggings or underwear. Bulky pockets, belts and thick fabric can add misleading volume.
A mirror or helper
A side mirror helps confirm that the tape does not rise at the back. A trusted helper can check alignment without pulling.
how-to-measure-panty-size-hero.webp to replace this fallback.Step 1: find and measure the natural waist
Stand upright and breathe normally. Bend gently to one side; the crease that forms often helps locate the natural waist. For many people it is the narrowest area between the lower ribs and the top of the hips, although body proportions vary.
Wrap the tape around this point. Keep it comfortably close without indenting the body. Place a finger under the tape if you tend to pull. Record the number after a normal exhale, then repeat once.
Step 2: measure the fullest hip and seat
Stand with your feet together or naturally close. Move the tape down until it passes around the widest part of the hips and seat. This point may be lower than expected, so check the side and back in a mirror.
Keep the tape parallel to the floor. It should touch the clothing without flattening the body. Slide the tape slightly up and down; the largest level circumference is the full-hip measurement used by most underwear charts.
Step 3: check the tape from the side
A tape can look level from the front while rising several centimetres at the back. Turn sideways to a mirror or ask a helper to check. Correct alignment matters because a diagonal tape records a shorter path and can move the result into the wrong chart range.
Also check that the tape is not twisted and that the numbered side remains readable. Repeat each measurement. If the two readings differ, reset your posture and take a third rather than averaging a clearly poor measurement.
panty-measurement-tape-placement.webp to replace this fallback.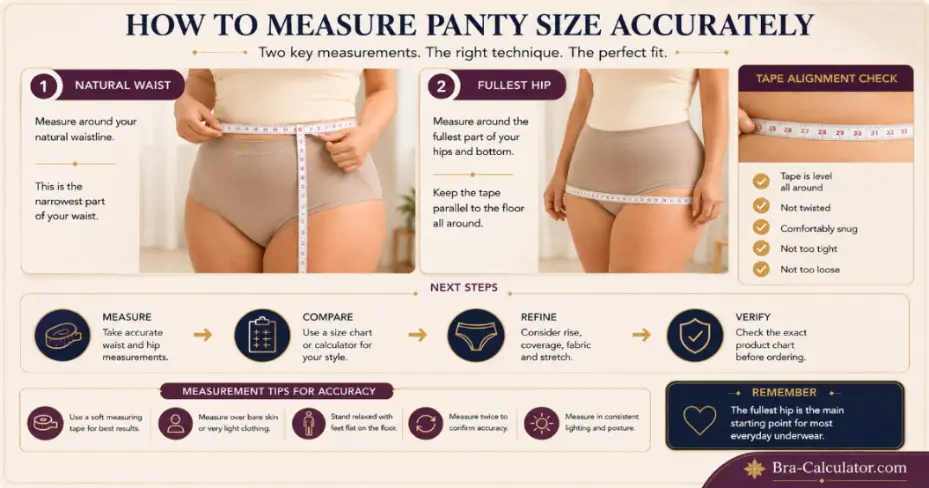
panty-measurement-level-tape-check.webp in 1600 × 900 format.Common measurement mistakes
Pulling the tape tight
This measures compression, not the body circumference a waistband must accommodate. The tape should rest against the body without creating an indentation.
Measuring over thick clothing
Jeans, cargo pockets and bulky seams can add volume. Use thin, smooth clothing or measure directly over underwear when comfortable.
Using the high hip instead of full hip
The high hip sits around the top of the hip bones. Most panty charts ask for the widest hip and seat measurement instead.
Changing posture
Arching, twisting, holding the stomach in or spreading the feet changes the tape path. Use a relaxed neutral stance.
What to measure for different rises
The natural waist and full hip are the most portable measurements because most charts publish them. For a low-rise style, it can also help to measure around the exact point where you want the waistband to sit. Compare that number with the garment’s stretch and rise description rather than treating it as a replacement for the full hip.
For long-leg boyshorts or anti-chafe shorts, a high-thigh measurement can explain leg openings that dig even when the waist and hip are correct. Product charts do not always publish thigh ranges, so reviews and flexible openings become important.
Accessible and assisted measuring
If standing is difficult, take measurements in the posture in which the underwear will be worn most often and note that the result may differ from a standing chart method. A helper can keep the tape level, but they should not pull it tighter than you would yourself.
The method works for anyone who uses waist and hip measurements. The purpose is to find a comfortable garment starting point, not to categorize a body or assign value to a size label.
Use the measurements
Underwear labels are not standardized across the industry. A letter such as Medium can represent a different waist and hip range from one brand to another, and two products carrying the same label may still fit differently because the rise, gusset width, leg opening, fabric recovery and waistband construction are not identical. For that reason, this guide treats a size as a starting point, not a permanent body label.
Our measurement-first method gives the fullest hip the strongest influence for most everyday panties because that measurement determines whether the garment can pass over and sit comfortably around the widest area. The natural waist is then used as a fit check. High-rise briefs, shaping styles and some period underwear need more attention at the waist, while low-rise bikinis and hipsters depend more heavily on the full-hip range.
Always compare your current measurements with the chart attached to the exact product you are considering. Product lines can be updated, fabrics can change, and a brand may use a separate chart for shapewear, period underwear or plus sizing. A careful chart check is more reliable than ordering from an old pair, a jeans label or a conversion found on a marketplace listing.
Enter the two numbers in the Panty Size Calculator or compare them with the universal panty size chart. Keep the numbers in your notes so you can check brand charts directly.
panty-size-measure-compare-verify.webp in 1600 × 900 format.A five-minute accuracy routine before you calculate
Prepare the tape
Use a flexible body tape over thin, close-fitting clothing or directly against the skin. A rigid ruler, stretched elastic or thick garment adds avoidable error.
Take each number twice
If the two readings differ, reset your posture and take a third. Record the measurement that repeats rather than averaging an obviously crooked reading.
Use a side check
A mirror or phone camera placed at waist height can confirm that the tape is parallel to the floor. Do not upload the image; it is only a private alignment check.
Record the date and unit
Write “in” or “cm” beside the numbers. This prevents the most damaging calculator error: entering centimetres as inches or mixing an older waist with a newer hip measurement.
How to confirm the result after delivery
Keep the written waist and hip numbers beside you so the fitting test checks the calculation rather than relying on memory.
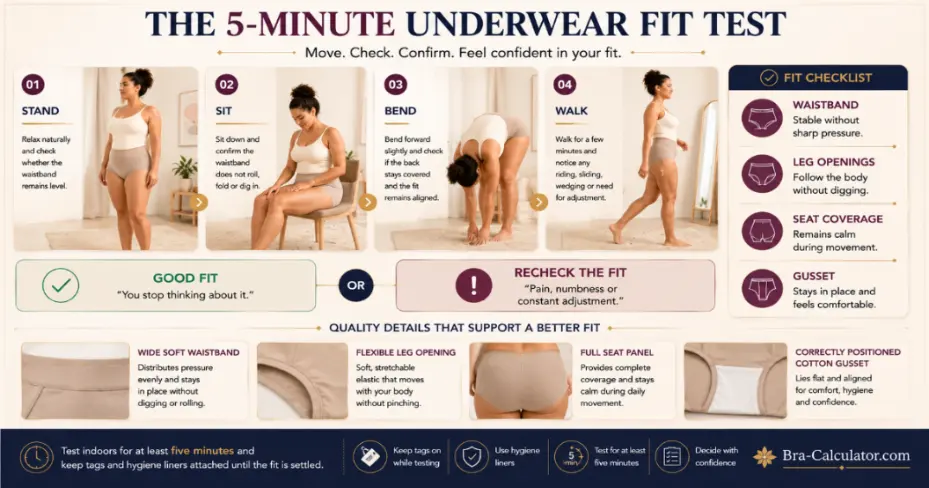
Check pressure and stability
The waistband should stay where the style is designed to sit. It should not create sharp pressure, fold repeatedly, slide downward or require constant pulling. A light temporary impression can occur with close-fitting elastic, but pain, numbness or deep persistent marks are not a successful fit.
Walk, sit and lift one knee
Leg edges should follow the body without cutting into the hip crease or floating away. If they dig while the waist feels loose, the problem is probably the opening shape or insufficient hip room rather than an all-over smaller waist size.
Look for calm fabric
The back should remain in place during several minutes of normal movement. Repeated wedging, crawling or excess fabric indicates a coverage, gusset or seat-shape mismatch. Sizing up can help when the fabric is stretched; it can worsen the problem when the cut is already too loose.
Confirm placement, not just width
The gusset should sit where intended without being pulled too far forward or backward. Poor placement can result from the wrong rise, a short body length, tight hips or a cut that does not suit the wearer’s proportions.
For ordinary underwear, a short indoor movement test usually reveals more than a still mirror check. Keep tags attached until the fit is settled.
- Test for at least five minutes indoors. Stand, sit, bend, walk and use stairs if available.
- Compare one variable at a time. When trying two sizes, keep the brand, style and fabric identical.
- Notice adjustment frequency. The better fit is usually the option you stop thinking about.
- Recheck the seller return conditions. Underwear policies vary, so use an allowed try-on method and keep hygiene liners and packaging intact.
Common mistakes with how to measure panty size
Using an old measurement
Body measurements can change while the familiar clothing label stays the same. Use a current waist and full-hip reading whenever the last result feels less reliable or you are buying a less forgiving construction.
Mixing measurement points
The natural waist, high hip and fullest hip are different circumferences. Measure the point requested by the product chart rather than placing the tape where the waistband of a favourite garment happens to sit.
Assuming more stretch always means size down
Stretch describes how far fabric can move; recovery describes whether it returns and remains stable. A highly stretchy garment with weak recovery can slide or distort, while firm recovery can feel smaller than expected.
Comparing unrelated products
A change from a cotton brief to seamless microfiber changes fabric, seams, rise and coverage at the same time. To isolate size, compare adjacent labels in one identical product.
What to check on the product page
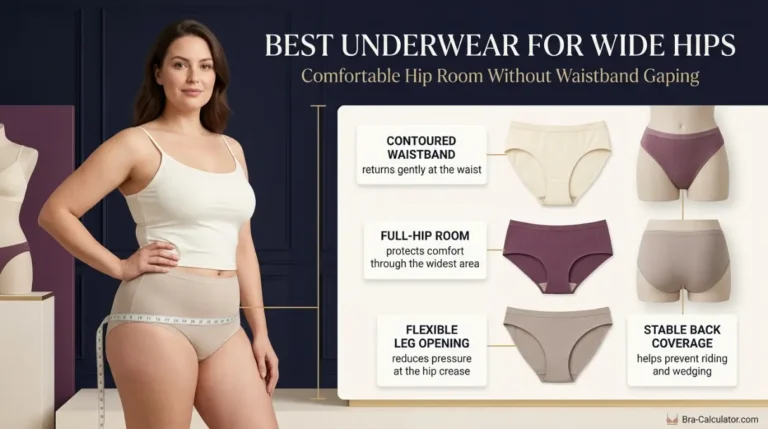
Before using how to measure panty size guidance to place an order, read the product page as a fit document rather than a marketing page. The most useful details are often below the headline: the body-measurement chart, rise description, fabric composition, model measurements, coverage photographs and return conditions.
Confirm which measurements the chart uses
Some charts list natural waist and fullest hip; others list only a clothing size or a garment measurement. Do not treat these as interchangeable. A garment measurement includes design ease and stretch, while a body chart describes the intended wearer range.
Locate the actual waistband
Words such as low, mid and high rise are relative. Use side photographs, side-seam height and any “sits at” description to estimate where the waistband will cross your body. That point determines whether the natural waist or high hip is the better comfort check.
Separate stretch from recovery
Elastane content can suggest stretch, but knit density and elastic construction affect recovery. Reviews that mention sliding, bagging, rolling or unusually firm elastic can be more useful than a simple statement that the fabric is stretchy.
Study front, side and back views
Coverage names are inconsistent. Look at the width across the seat, the leg-opening angle, gusset length and whether the style narrows sharply at the back. These details help predict riding, wedging and visible lines.
For recommended categories such as soft body measuring tape, full-length mirror, seamless test briefs, compare recent fit comments from shoppers with similar waist-to-hip proportions rather than relying only on height or weight. Finally, check whether underwear returns are accepted, whether the hygiene liner must remain attached and whether multipacks can be partially returned. A careful product-page audit reduces the need to guess and protects the usefulness of the calculator result.
How this guide handles uncertainty
Bra-Calculator.com separates measurement, label conversion and construction because they answer different questions. The measurement suggests a body range; the regional label helps you navigate a retailer; the garment construction determines how that label behaves in real movement.
Official brand guidance was checked on 2026-07-20. We do not claim that one universal chart overrides a seller’s current product chart, and we do not use price, star-rating or inventory claims that can become stale. Where waist and hip data disagree, the guide explains the trade-off instead of presenting false precision.
Primary editorial references
- Jockey Size Charts — Natural-waist and fullest-hip measurement instructions.
- Wacoal Size Charts — Published panty waist and hip ranges showing why brand charts matter.
Relevant products to compare
These recommendations are selected by construction and fit purpose. They open current Amazon search results rather than making fixed price, stock or rating claims.
Affiliate disclosure: As an Amazon Associate, Bra-Calculator.com earns from qualifying purchases at no extra cost to you. Recommendations are based on fit criteria, not commission rates.
Soft body measuring tape
A flexible, clearly marked tape is easier to keep level.
- Compare the exact seller size chart.
- Check rise, fabric and coverage before ordering.
- Prices and availability can change.
Full-length mirror
A side view helps reveal a rising or sagging tape.
- Compare the exact seller size chart.
- Check rise, fabric and coverage before ordering.
- Prices and availability can change.
Seamless test briefs
A simple stretch style makes it easier to assess the result.
- Compare the exact seller size chart.
- Check rise, fabric and coverage before ordering.
- Prices and availability can change.
Frequently asked questions
It is usually the narrowest point between the ribs and hips. Bending gently to one side can help identify the crease.
Measure around the widest part of the hips and seat, with the tape level and feet together or naturally close.
Comfortably close without indenting the body. It should not sag, but it should not compress.
Use thin, close-fitting clothing or underwear. Avoid jeans, belts, thick seams and pockets.
Repeating catches a tilted tape, changed posture or accidental tension before it affects the size result.
The full hip is usually more influential, but the waist remains useful for chart comparison and proportion checks.
Yes. Ask them to keep the tape level and comfortably close without pulling.
Use whichever system the product chart provides. Measuring in one unit and converting accurately is fine.
Continue through the sizing system
Measure First. Then Choose the Construction.
Use the Panty Size Calculator for a private starting size, regional equivalents, fit-conflict explanation and product suggestions matched to your rise and comfort preferences.